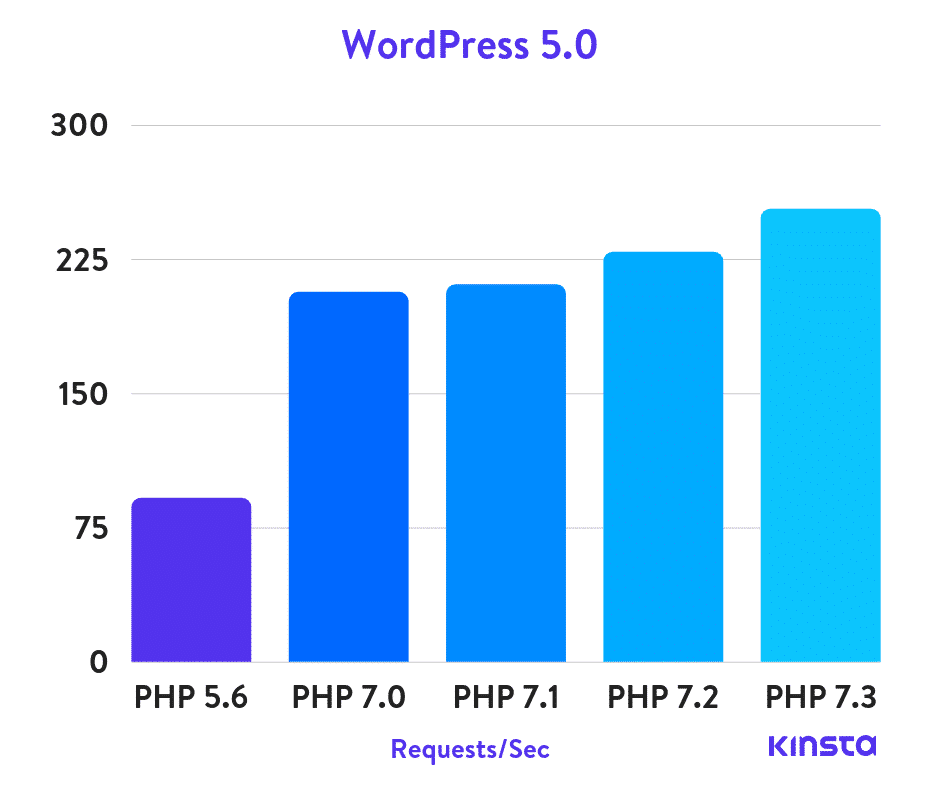
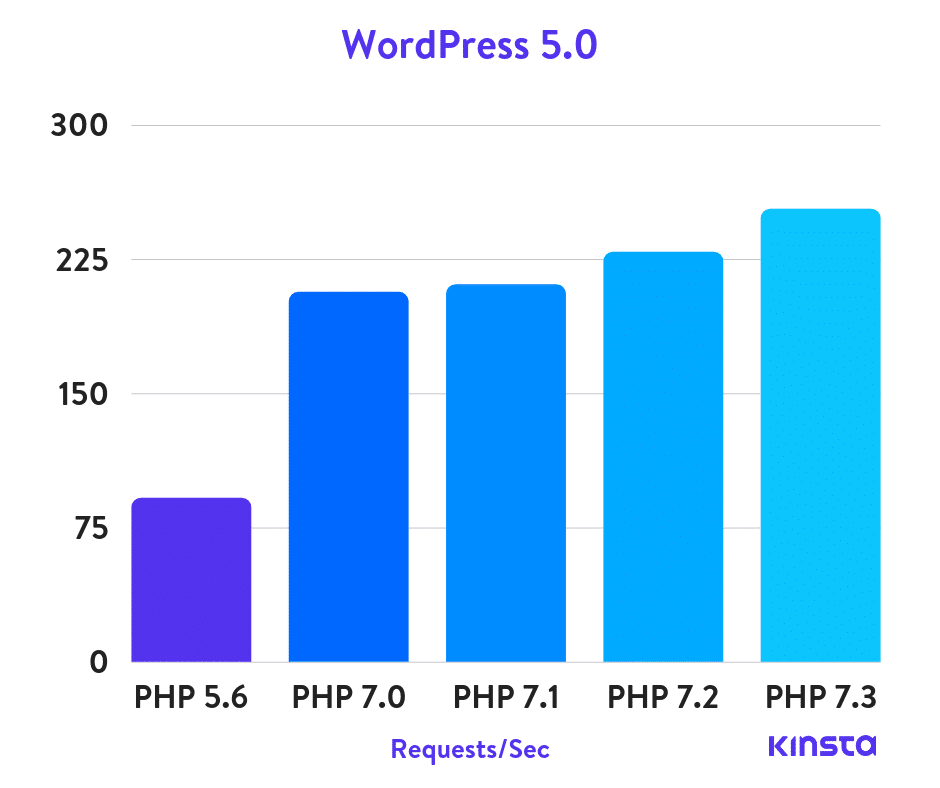
According to the latest tests conducted by kinsta.com, the new PHP 7.3 has been improved further and now is about 20% faster than PHP 7.0 with WordPress 5.0 as you can see from the chart below

Img src: Kinsta
Given that PHP 7.0 is already much faster than the older versions, if you are upgrading from PHP 5.6 to PHP 7.3 you will see a MASSIVE difference in how your website or app performs.
And it’s not so complicated to do so. Let me walk you through the steps you need to take.
For this example, I will use one of my Digital Ocean basic droplets with Ubuntu 18.04.2 LTS, which is currently running on PHP-FPM 7.0 and Nginx 1.14.
#1 Update Ubuntu
First, we need to update current Ubuntu packages, following the
sudo apt-get updatecommand, which will download the package list from the repositories, and then
sudo apt-get upgradeto fetch new versions of packages existing on the machine.
After everything goes smoothly we can proceed with the next step.
#2 Install PHP7.3
Before installing the latest version of PHP, make sure that you add the ondrej/php repository to your system
sudo add-apt-repository ppa:ondrej/phpAnother important thing to check before installing a newer version of PHP is to see the current PHP-related packages you are using.
There is a big chance that something may not work after updating, therefore I recommend writing down everything you have at the moment to prevent some unwanted downtime.
To list all your current PHP packages type
sudo apt list --installed | grep "php*"You should see a bunch of packages.
Now for example, if you are using PHP 7.0, the packages that matter are the ones starting with php7.0-* ( for example php7.0-xml, php7.0-curl, etc. ). They are version-dependent therefore we need their appropriate versions.
We can proceed and install the newer PHP version ( also FPM like the old one )
sudo apt-get install php7.3-fpmthen go ahead and install the appropriate packages for this version ( also the ones you’ve written down from before )
sudo apt-get install php7.3-mysql php7.3-cli php7.3-xml php7.3-gd php7.3-imagick php7.3-recode php7.3-tidy php7.3-xmlrpcNow we have the latest version of PHP! But it’s not active yet, so let’s go ahead and activate it.
# Activate PHP 7.3
To change the version used by the web server, we simply need to update the PHP-FPM socket in the Nginx configuration file, which is located here
/etc/nginx/sites-available/defaultHowever, if you have 2 or more websites, you will have 2+ config files and you need to go through all of them to change the PHP version. But let’s assume we only have the default config file. Open the file in your favorite editor
sudo vim /etc/nginx/sites-available/defaultand search for the following piece of code
location ~ \.php$ {
include snippets/fastcgi-php.conf;
fastcgi_pass unix:/run/php/php7.0-fpm.sock;
}
Change the PHP-FPM socket in the last line to 7.3 ( simply change php7.0-fpm.sock to php7.3-fpm.sock ), save and close the file.
Run the Nginx configuration test to confirm everything is correct
sudo nginx -tAnd restart the server so the changes can take effect
sudo service nginx restartWe have now successfully changed the PHP version of our server. To confirm, you can use a plugin like Server Info to check the current PHP version and extensions.
You can now observe for errors and if you notice some compatibility issues fallback to the older version of PHP by simply changing the Nginx configuration in /etc/nginx/sites-available/


